How to Buy Lightning Lane Passes at Disney World (A Resorts Gal Guide)
You’ve booked your Walt Disney World vacation, read our comparison of all three Lightning Lanes products, and hopefully, set up our Lightning Lane spreadsheet to guide you when it comes time to purchase your selections. Now it’s time to walk through the process of buying your Lightning Lanes via the My Disney Experience app. To save you the trouble of figuring it all out, I’ve created step-by-step instructions of what the process looks like with screenshots.
It’s a pretty simple process, but I use the My Disney Experience app nearly daily, whether in the parks or working from home. With that in mind, I wanted to create a clear and concise overview of what to expect when making your selections. We’ll get right to it. However, first, you need to know one thing.
To purchase Lightning Lane Multi Pass, Single Pass, or Premier Pass, you must have the My Disney Experience app on your mobile device. You’ll also need to make sure that resort reservations and tickets for each guest at your party are linked to the app. (It is of utmost importance that these things are completed before your Lightning Lane reservation date. If not, you might not be able to complete your purchase.)
About purchasing Lightning Lane Premier Pass: Since Lightning Lane Multi Pass and Single Pass debuted, Premier Pass was added. You will follow the same instructions below to purchase the Premier Pass. However, it’s important to note that this particular pass is only available to guests of select resort hotels at the time of launch. (We have a separate list of Premier Pass-eligible hotels.) If you’re eligible, the Premier Pass purchase option will be available on the home screen of the My Disney Experience app.
Step One: Open the My Disney Experience App
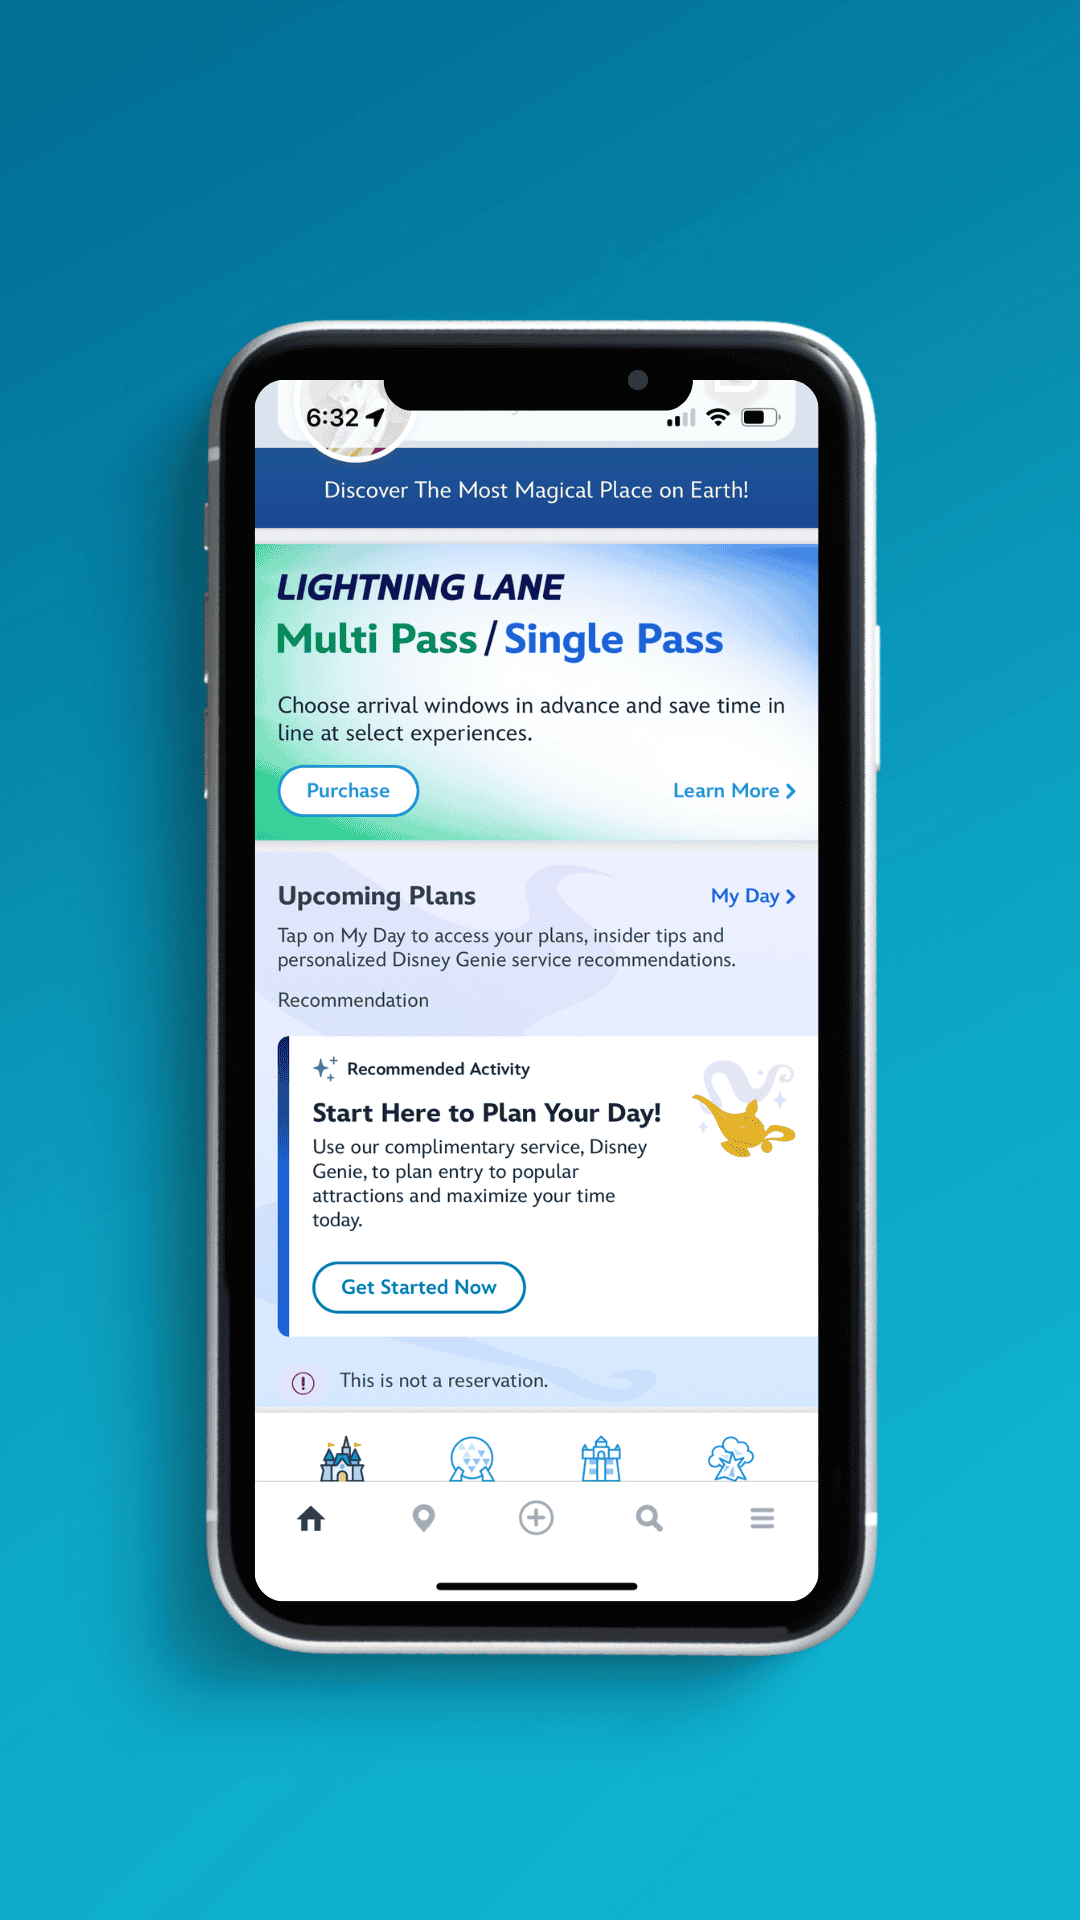
When you open the My Disney Experience app, you’re greeted by the home screen. About a third of the way down the screen, you’ll see the Lightning Lane Multi Pass/ Single Pass section in blue and green. The screen reads, “Choose arrival windows in advance and save time in line at select experiences.”
Step Two: Select Purchase
You’ll want to select the purchase button. (No worries. You won’t purchase anything until you’ve selected your passes and times.)
Step Three: Select Your Date
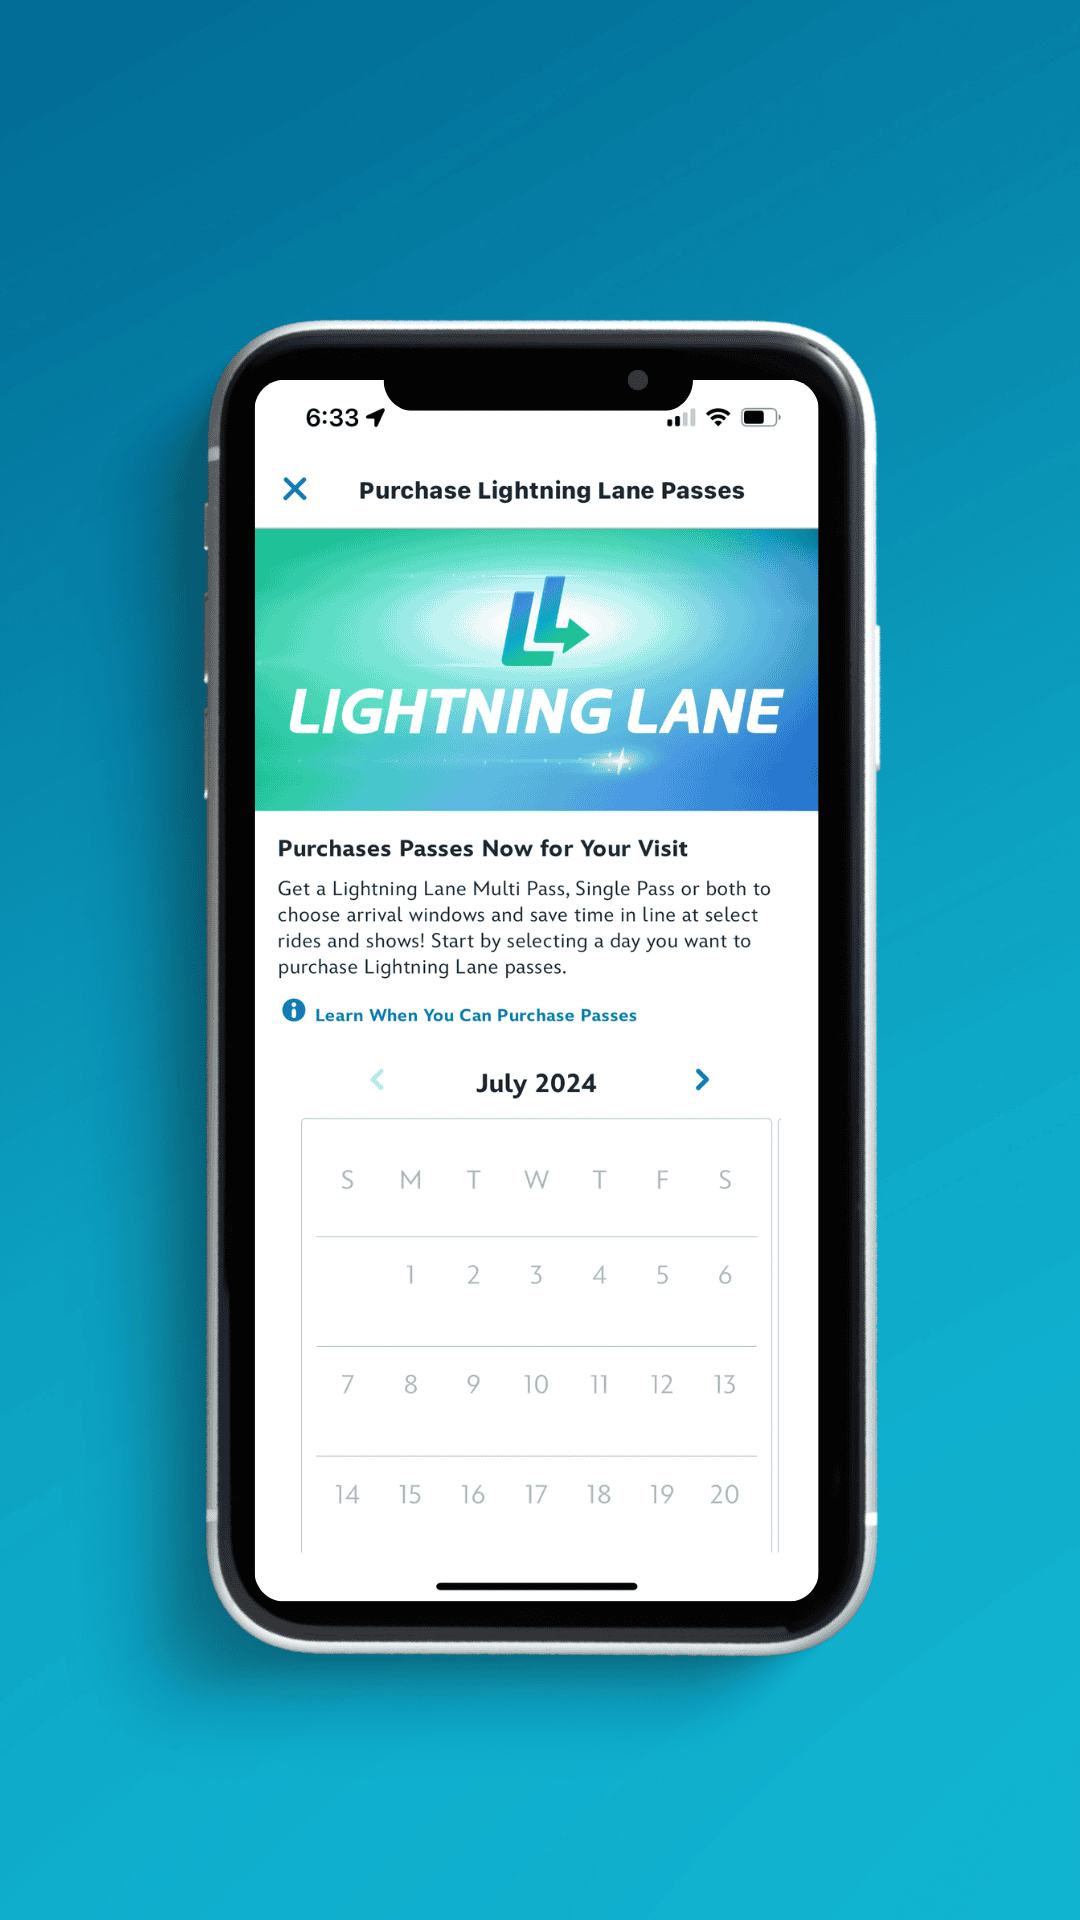
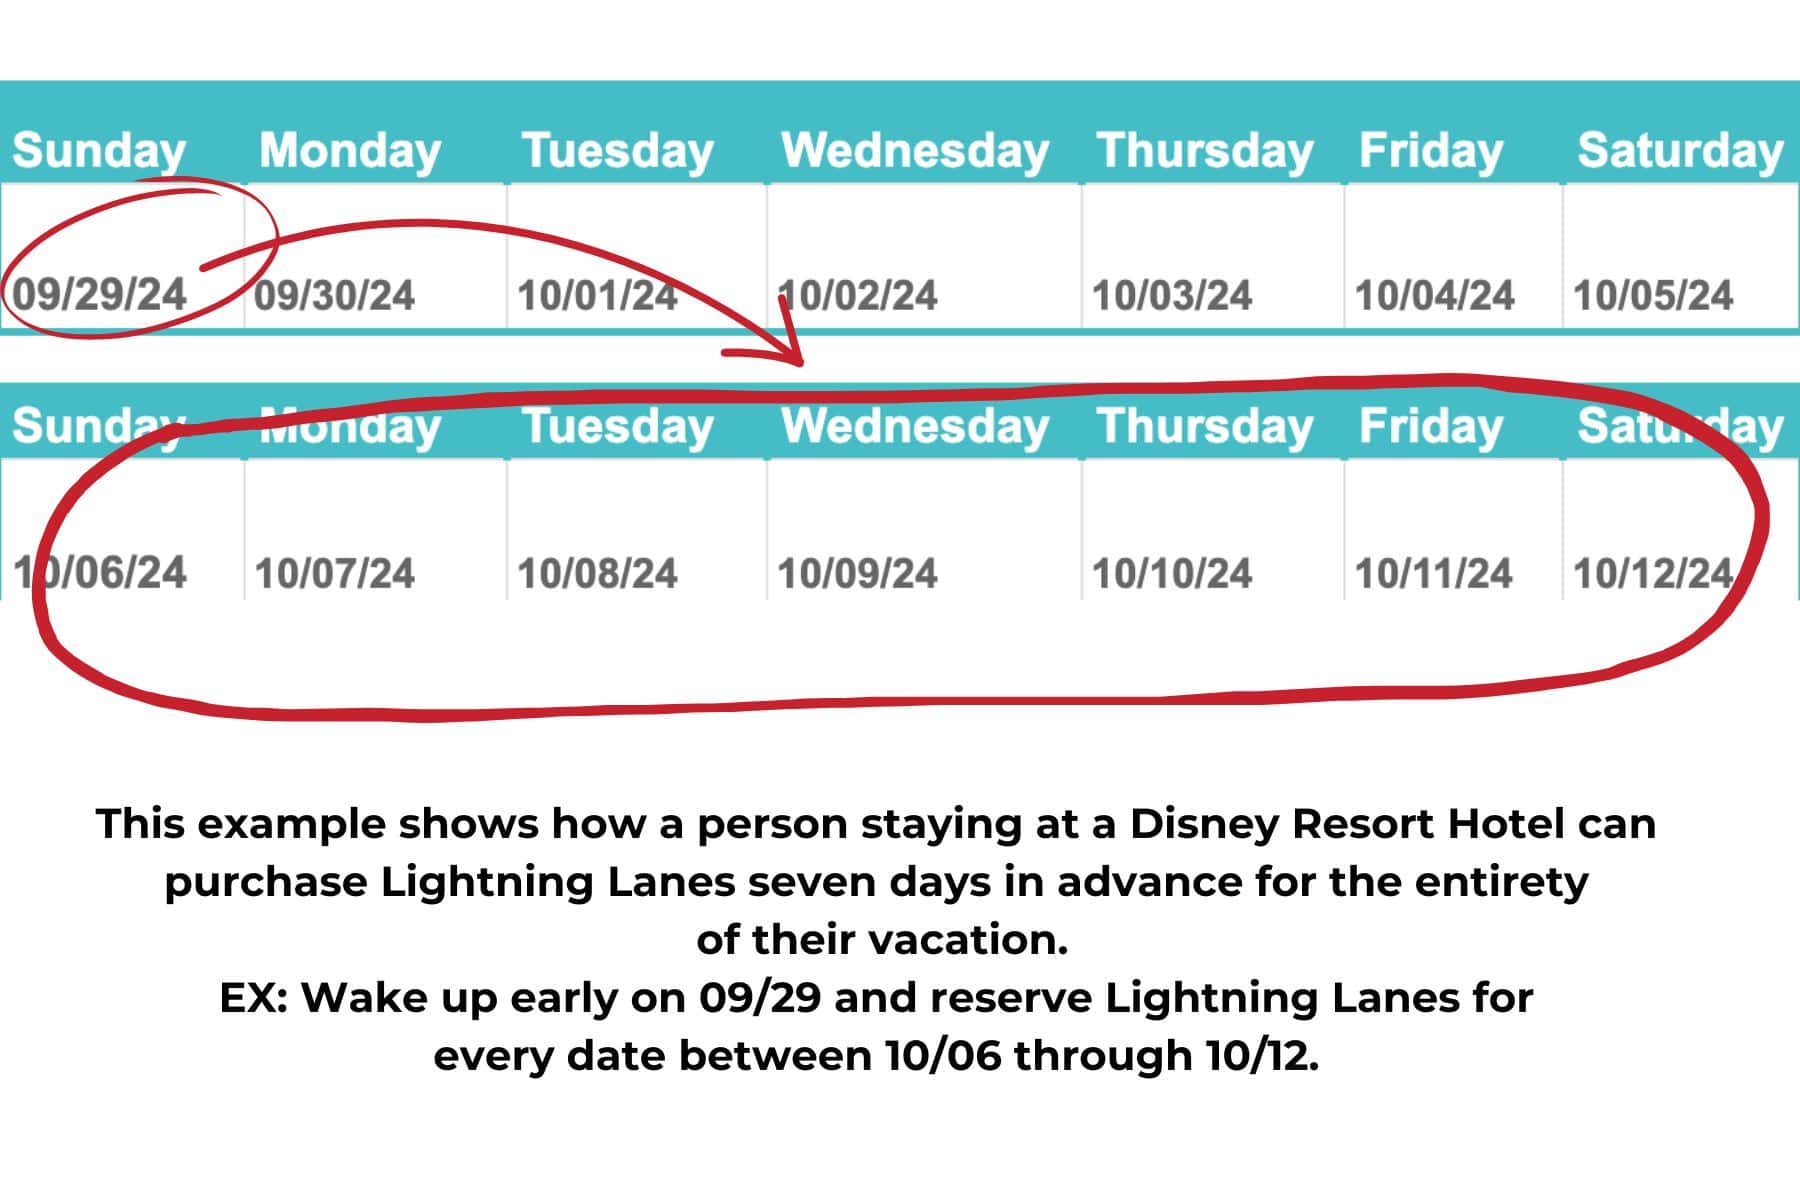
After selecting the purchase button, a new screen appears with a calendar. Your first available booking date will appear. As a resort guest, you’ll be able to book up to 7 days in advance for the entirety of your vacation. In most instances, I would recommend starting with your first available date. However, if you’re visiting during the holidays or a busier than usual time of year, you might want to start a little further out and work your way back.
For example, if you’re visiting the week between December 21st and December 28th, you might prefer to book your Lightning Lanes for Christmas Eve or Christmas Day before your other dates. This is not a requirement, and we haven’t had a chance to test this theory with the system yet. But it’s something to consider, depending on your travel dates.
All other guests (visiting from off-site) can complete this same process three days before their vacation. Here are the stipulations:
- Guests with date-based theme park tickets (which require the Guest to choose a start date at the time of purchase) can purchase 3 days before the first day of their ticket for the total number of valid admission days on their ticket.
- Guests with other ticket types can purchase 3 days before their park visit.
- Annual Passholders* can purchase 3 days before their park visit.
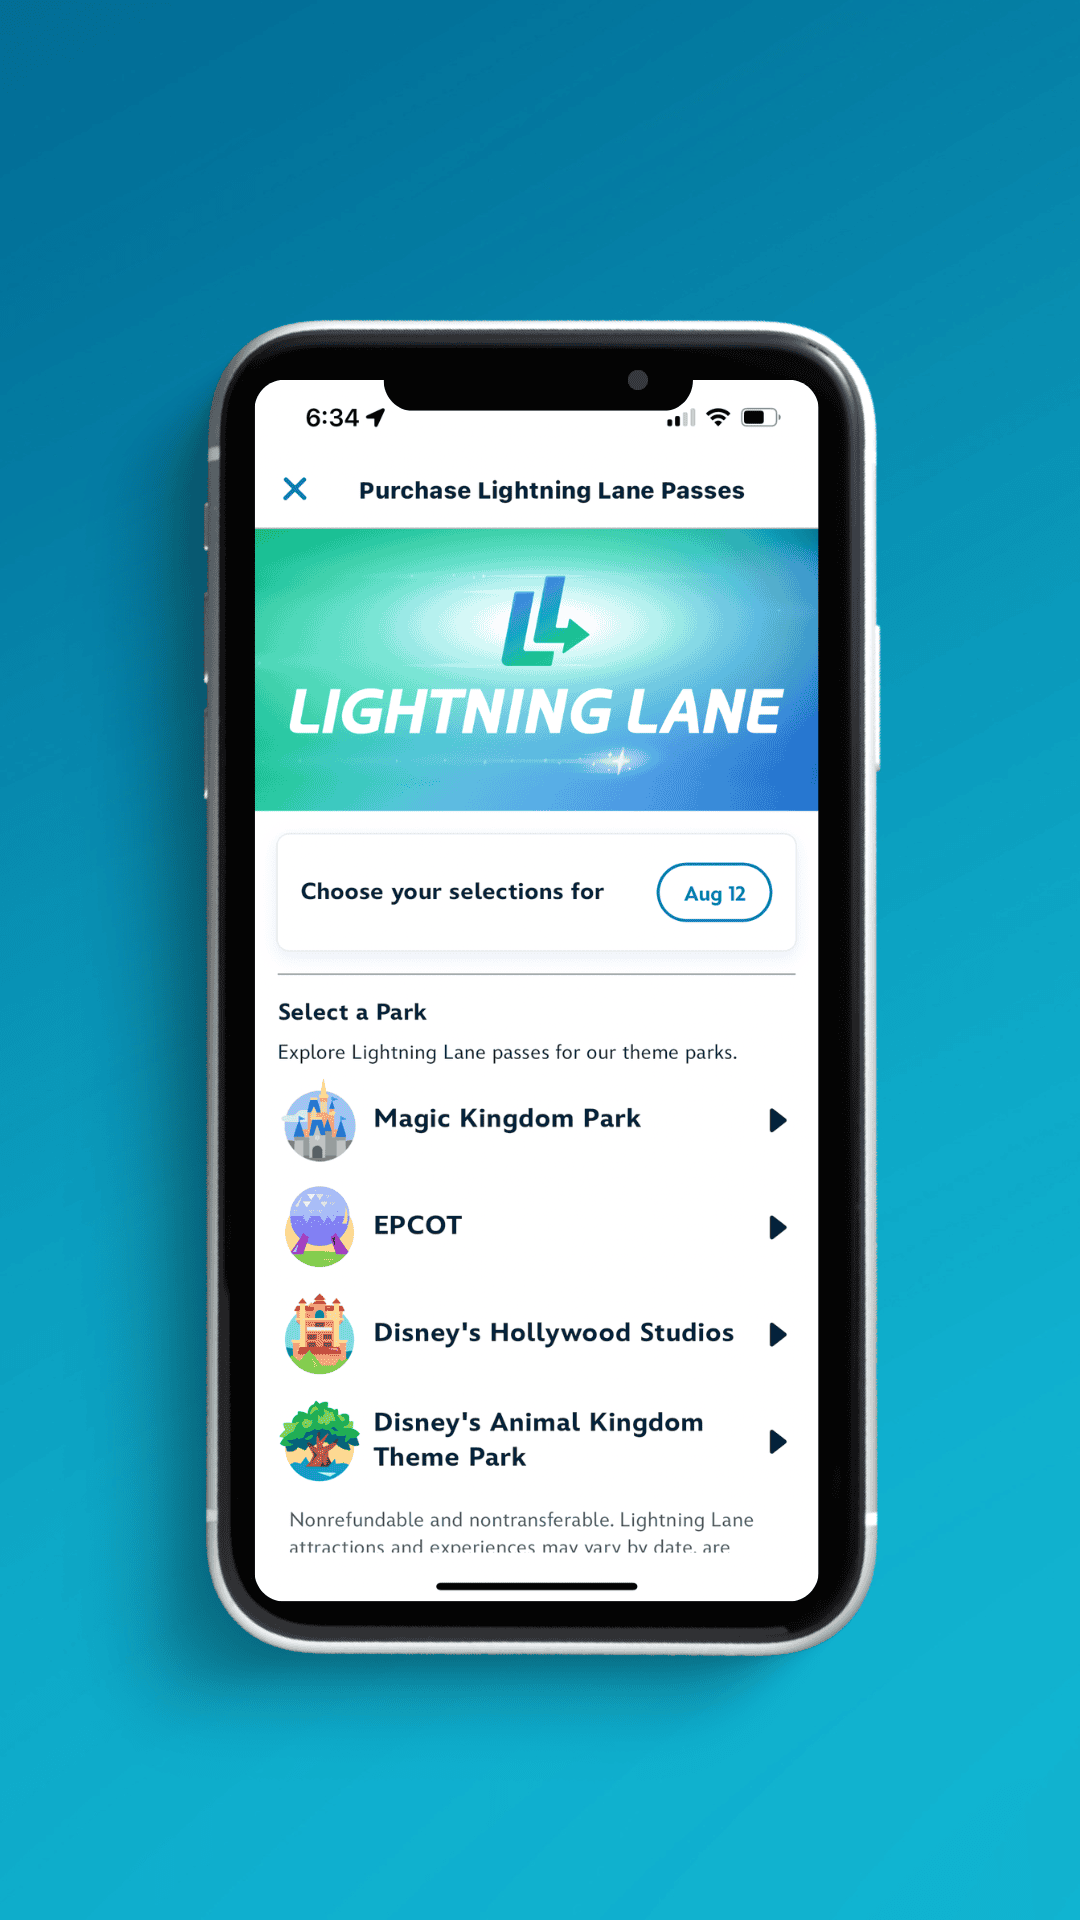
Step Four: Select Park
After selecting your desired date in the My Disney Experience app, a list of the four parks appears. You should select the park you’ve planned for this specific date.
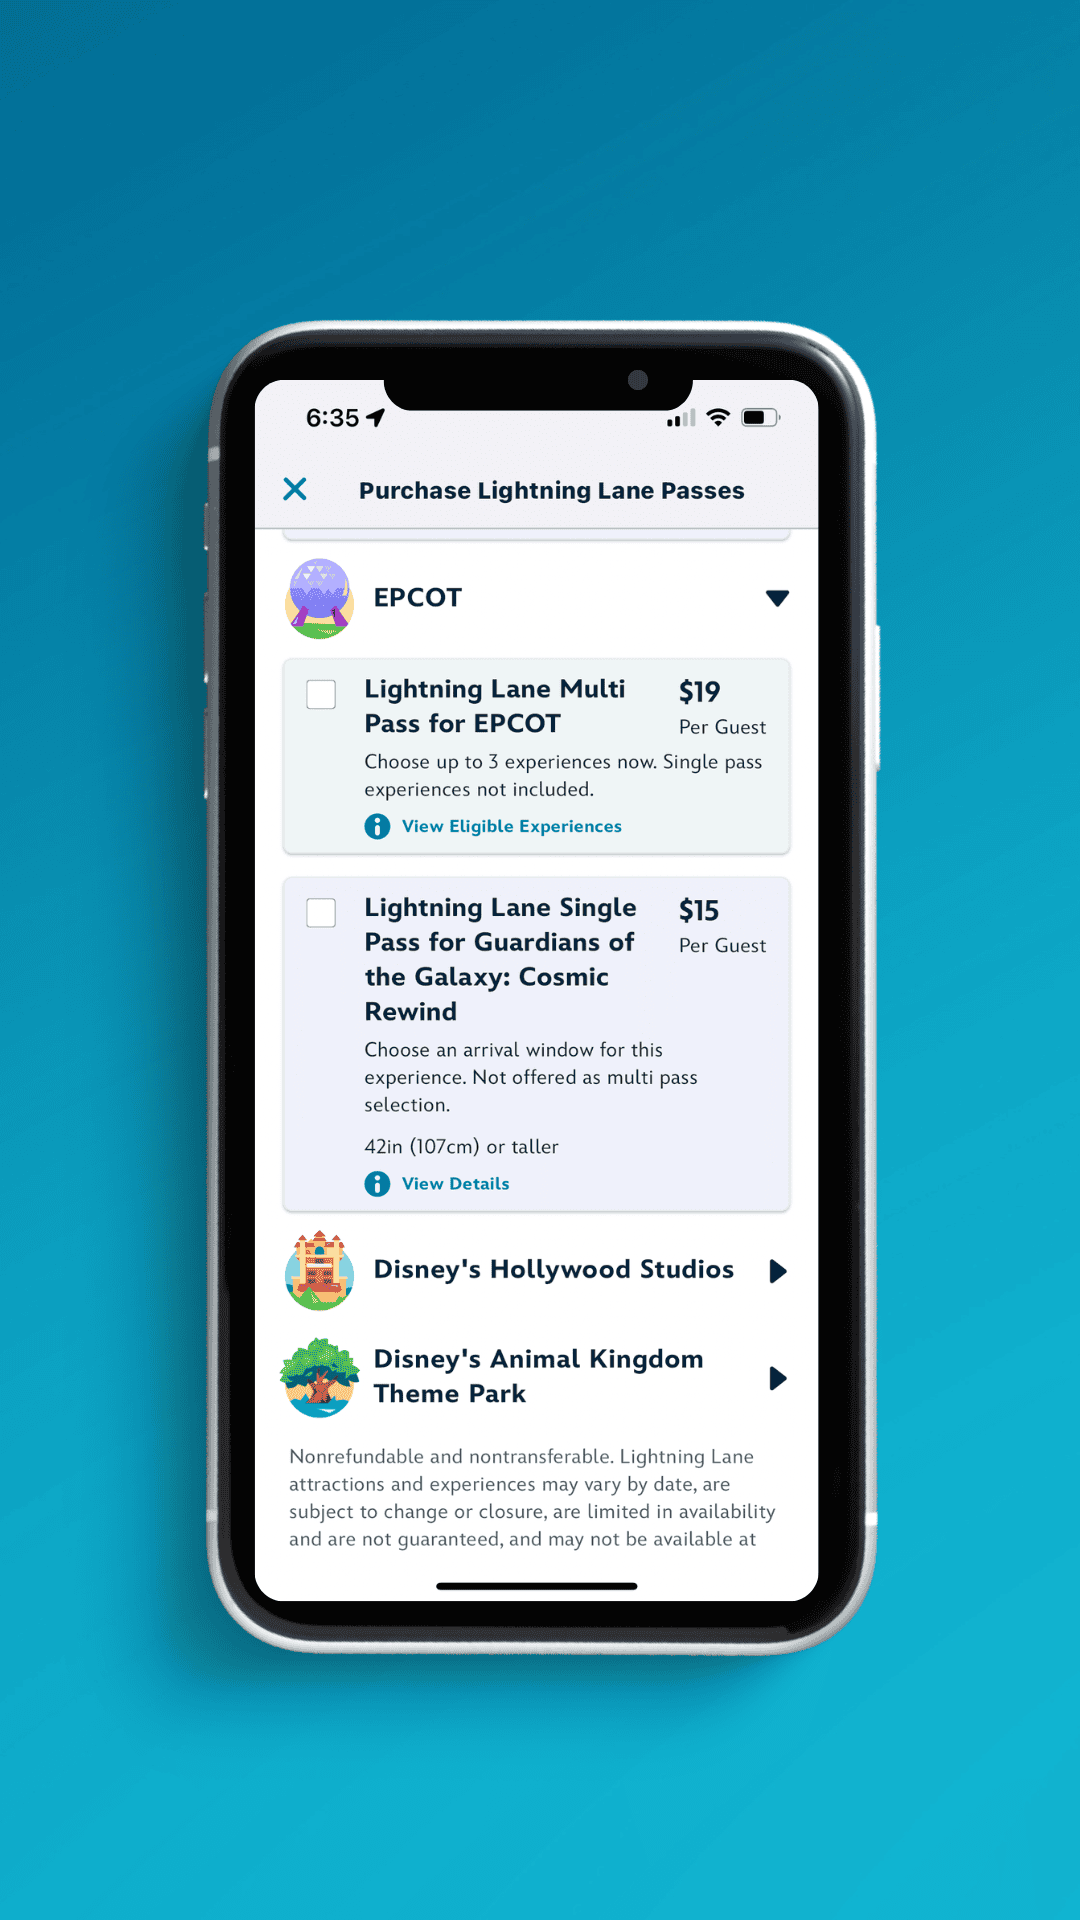
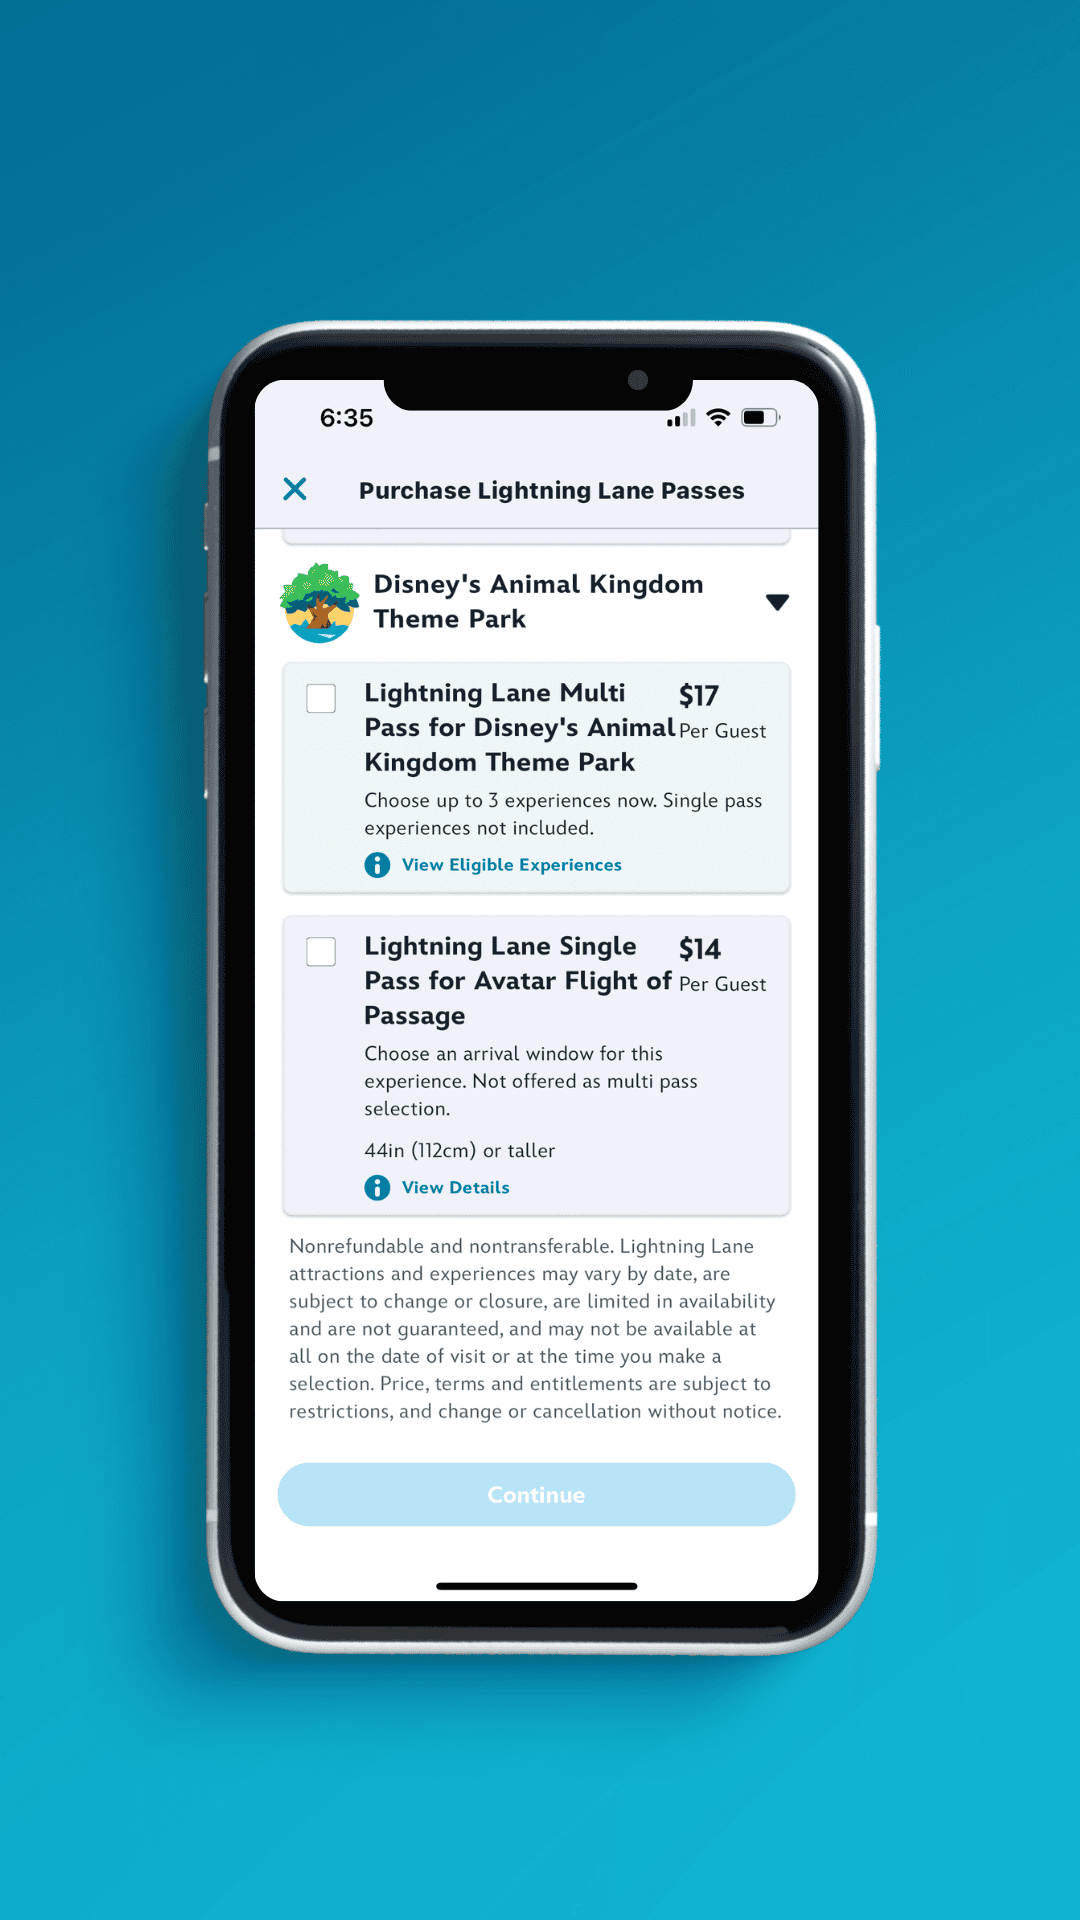
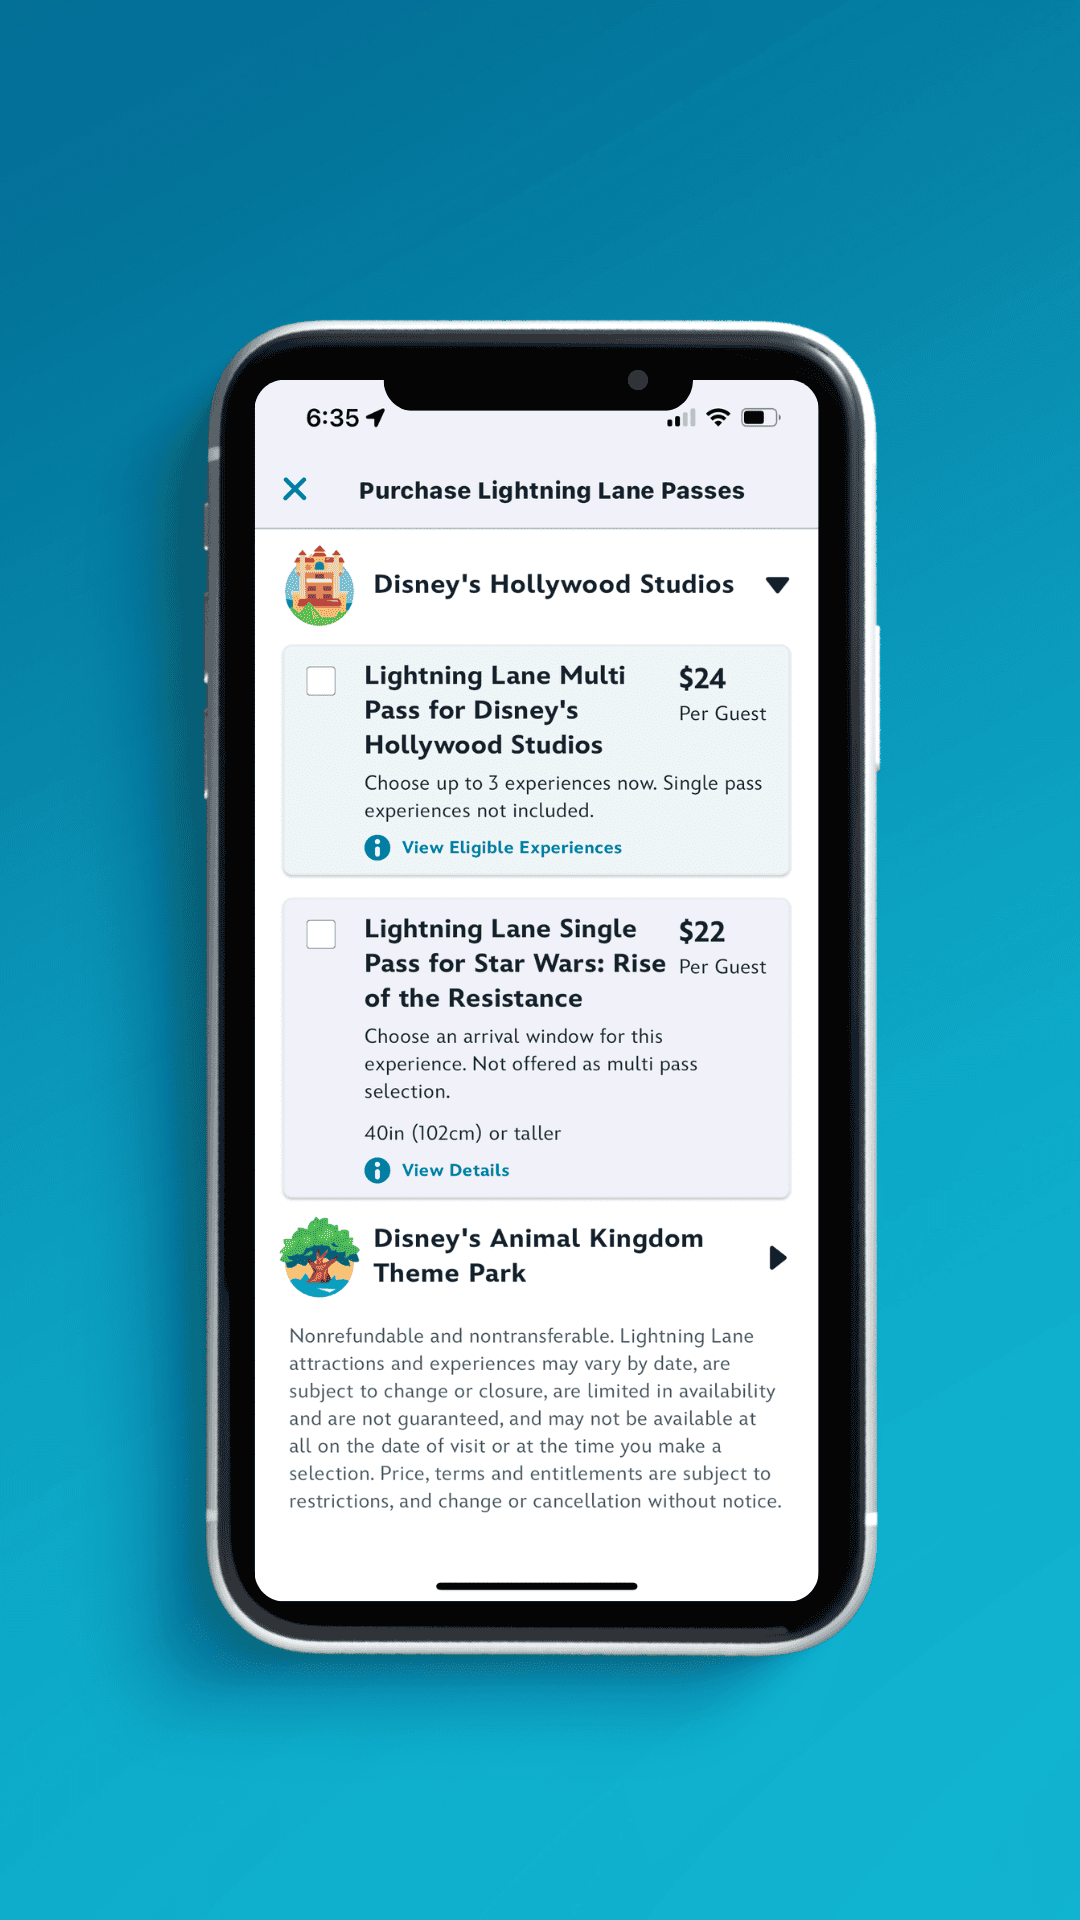
Step Five: Select Lightning Lane Multi Pass and/or Lightning Lane Single Pass (if applicable)
Once you select the park, you can purchase a Lightning Lane Multi Pass for that day and/or a Lightning Lane Single Pass (based on availability). If you’re purchasing both, make sure to tap on each one. A checkbox will appear indicating your selections. Here are a couple of screenshots for the parks. Note that the prices are date-based and will fluctuate.
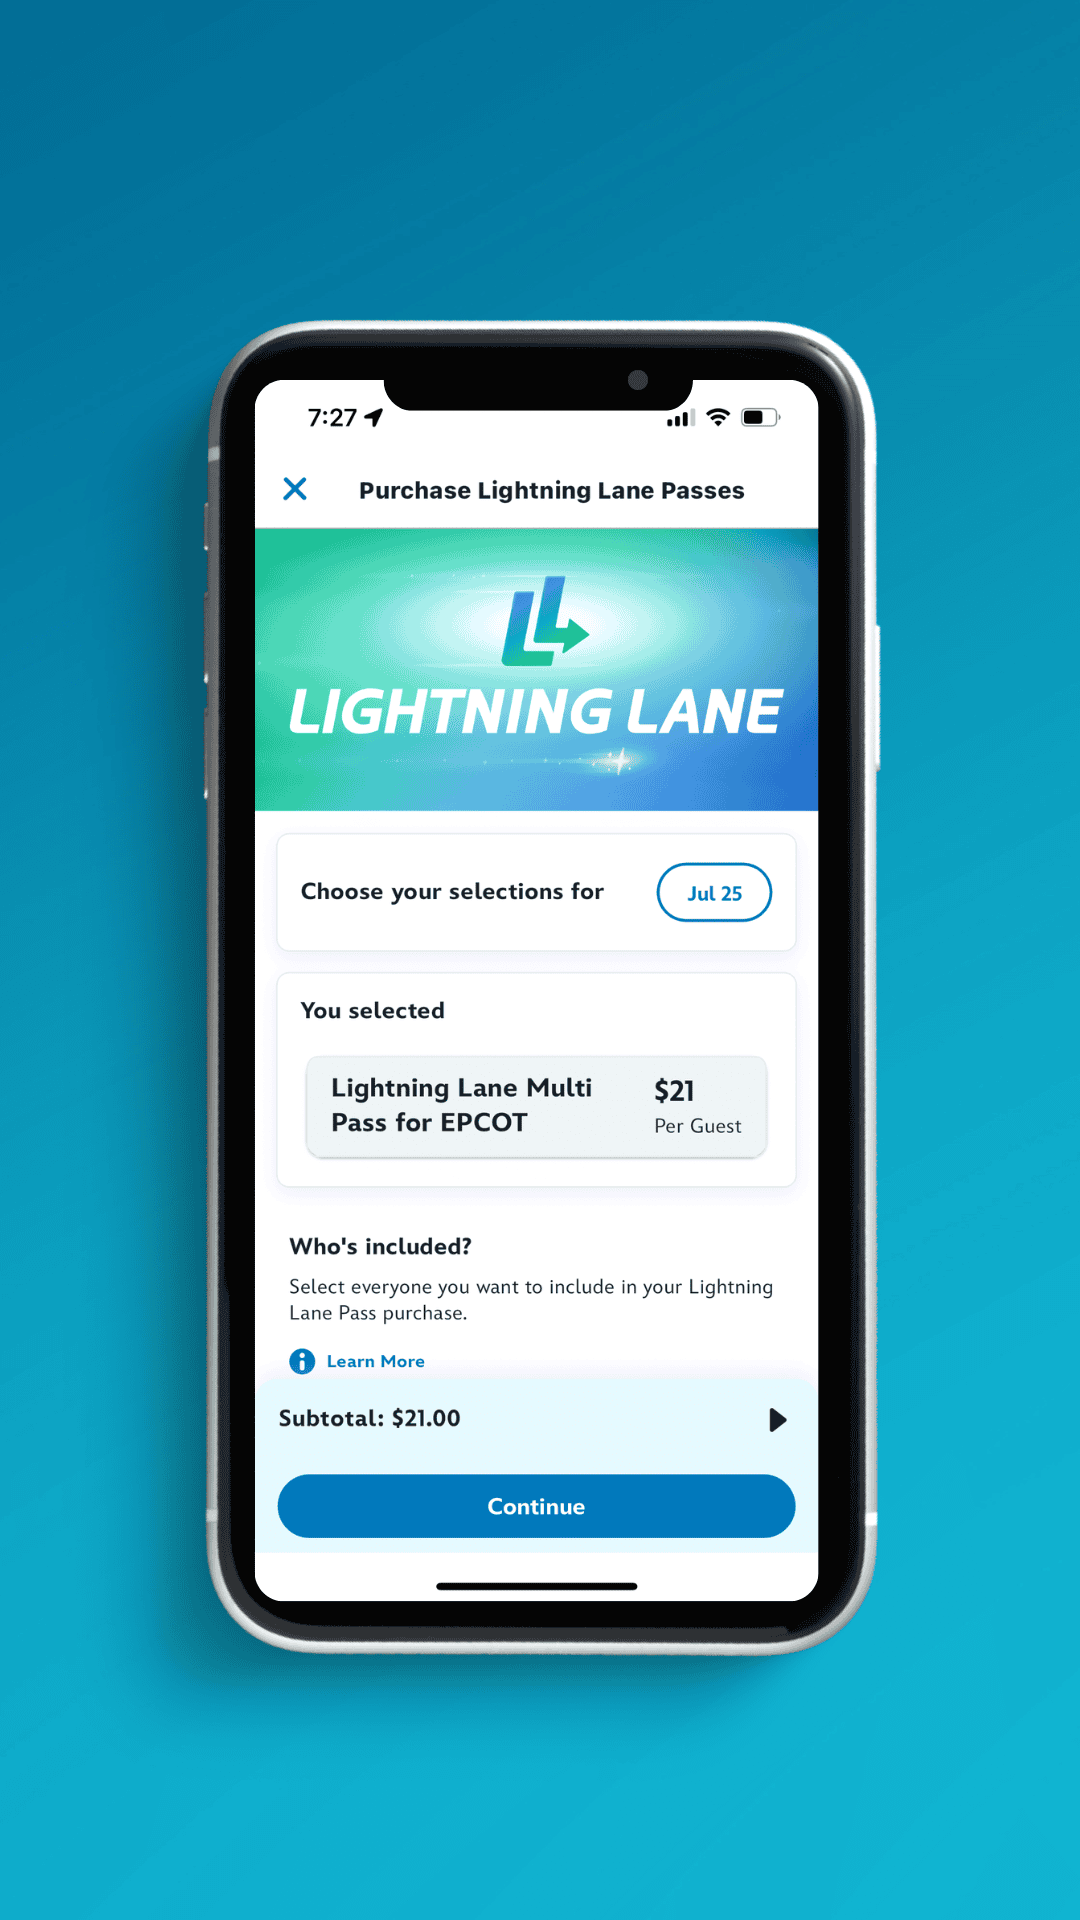
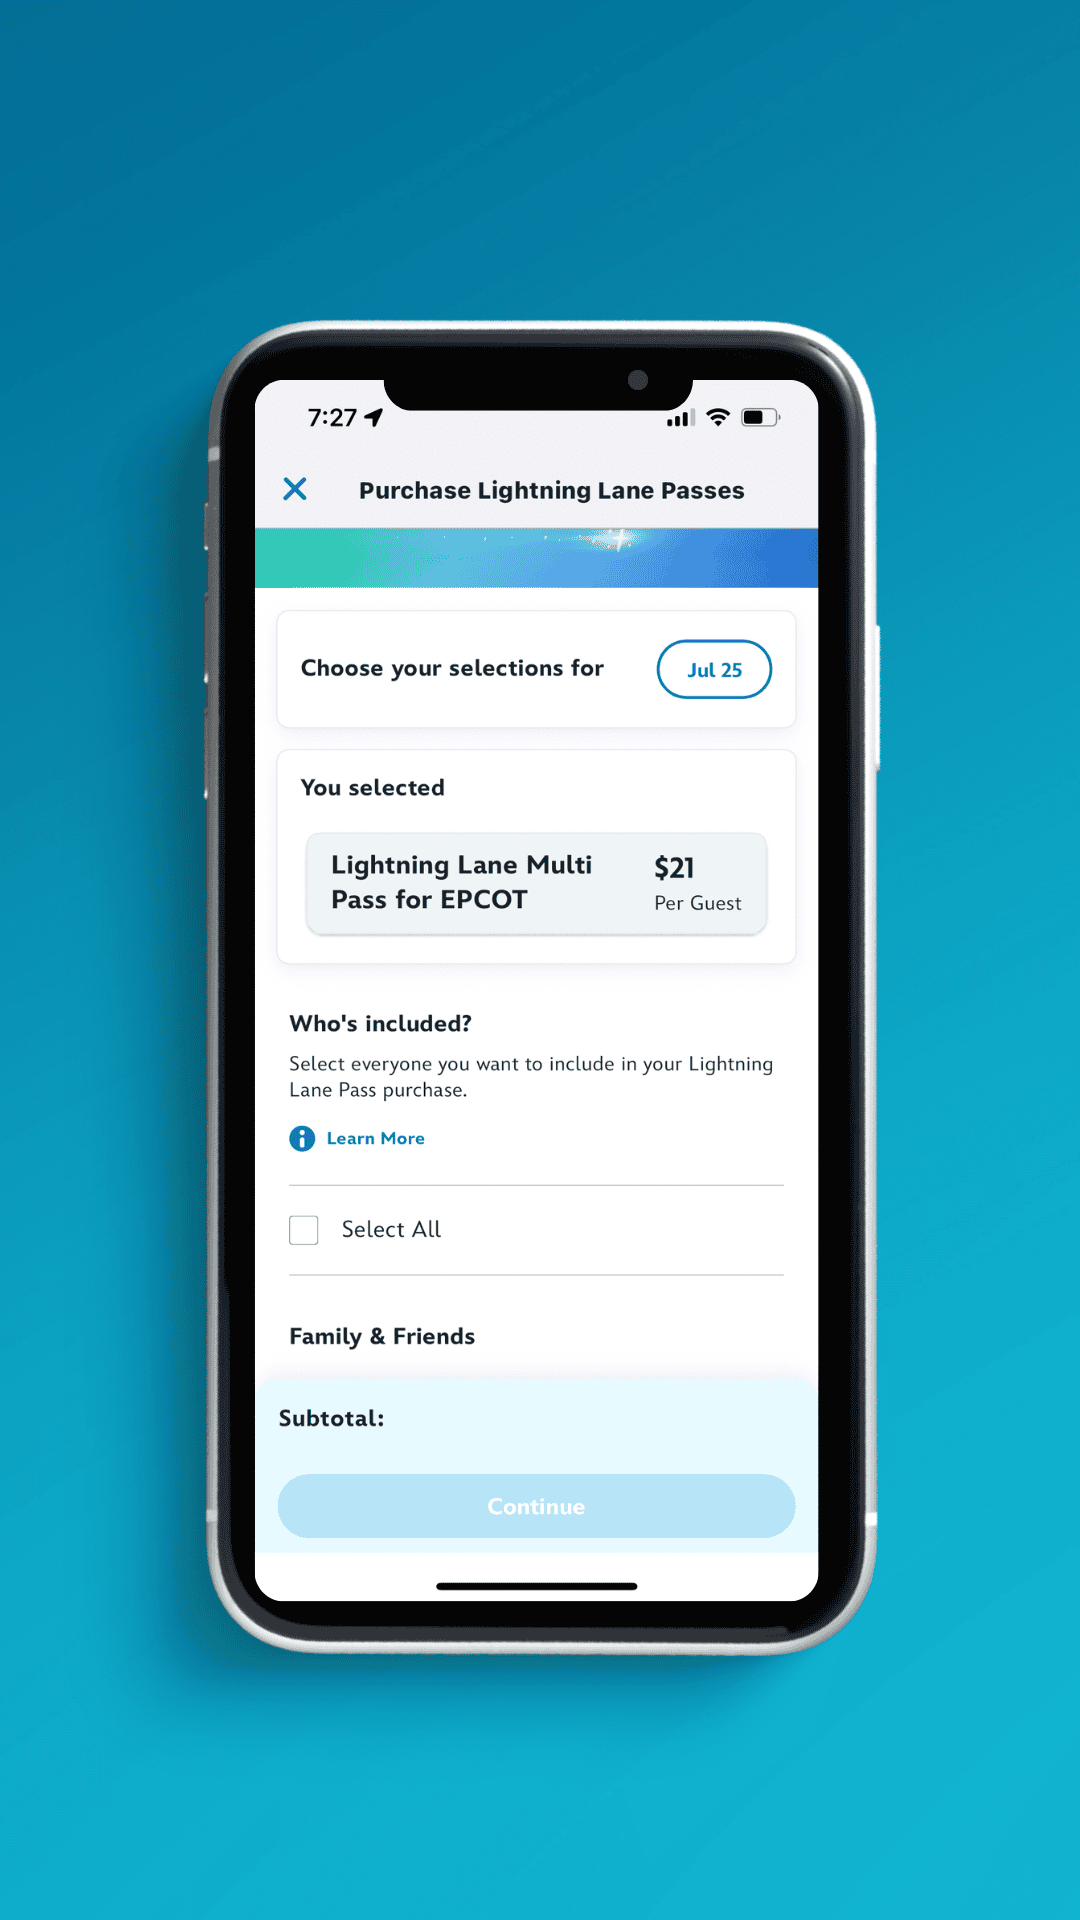
Step Six: Visually Confirm and Select Family and Friends
Next, you’ll want to select the “Continue” button at the bottom of the screen. You can visually confirm your selections on the next screen. If everything looks good, scroll down and select your family and friends. (Again, make sure that all reservations and tickets are linked to your My Disney Experience app well before this date.)
Step 7: Select Attractions
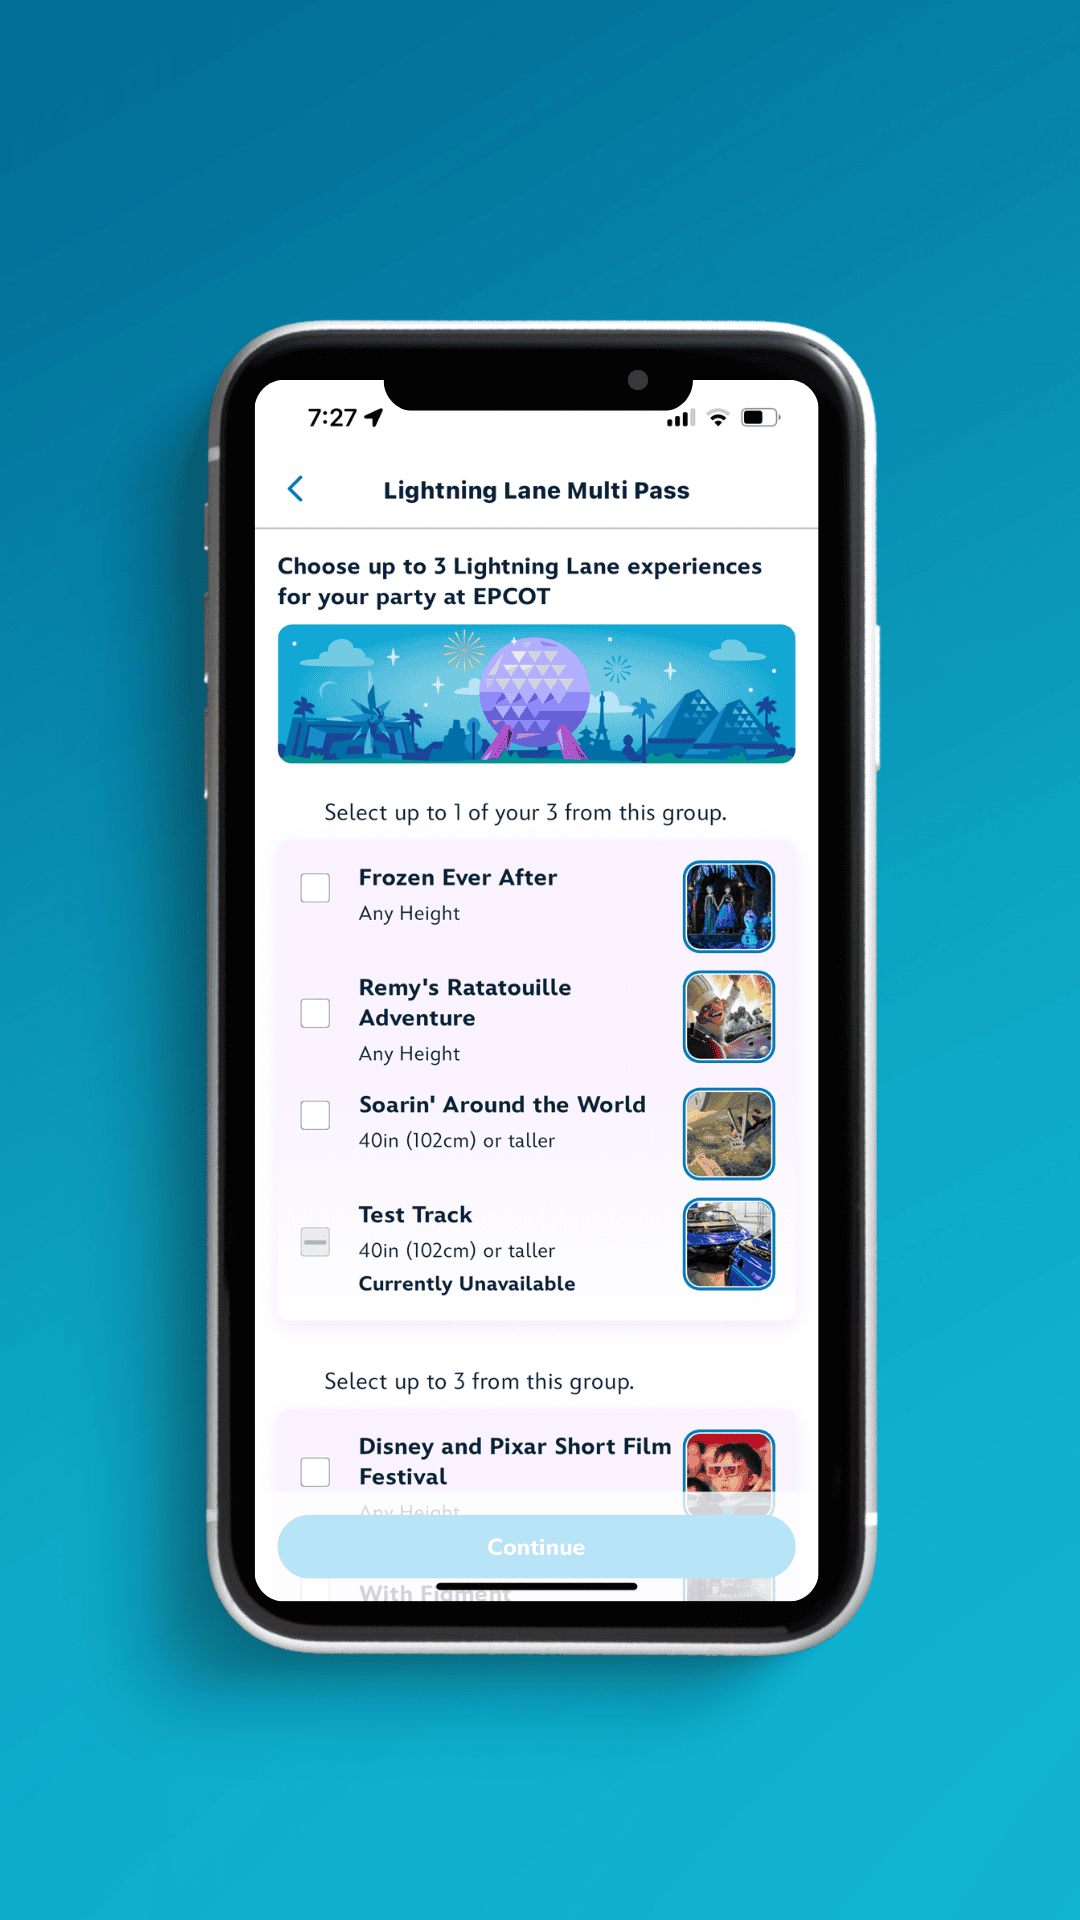
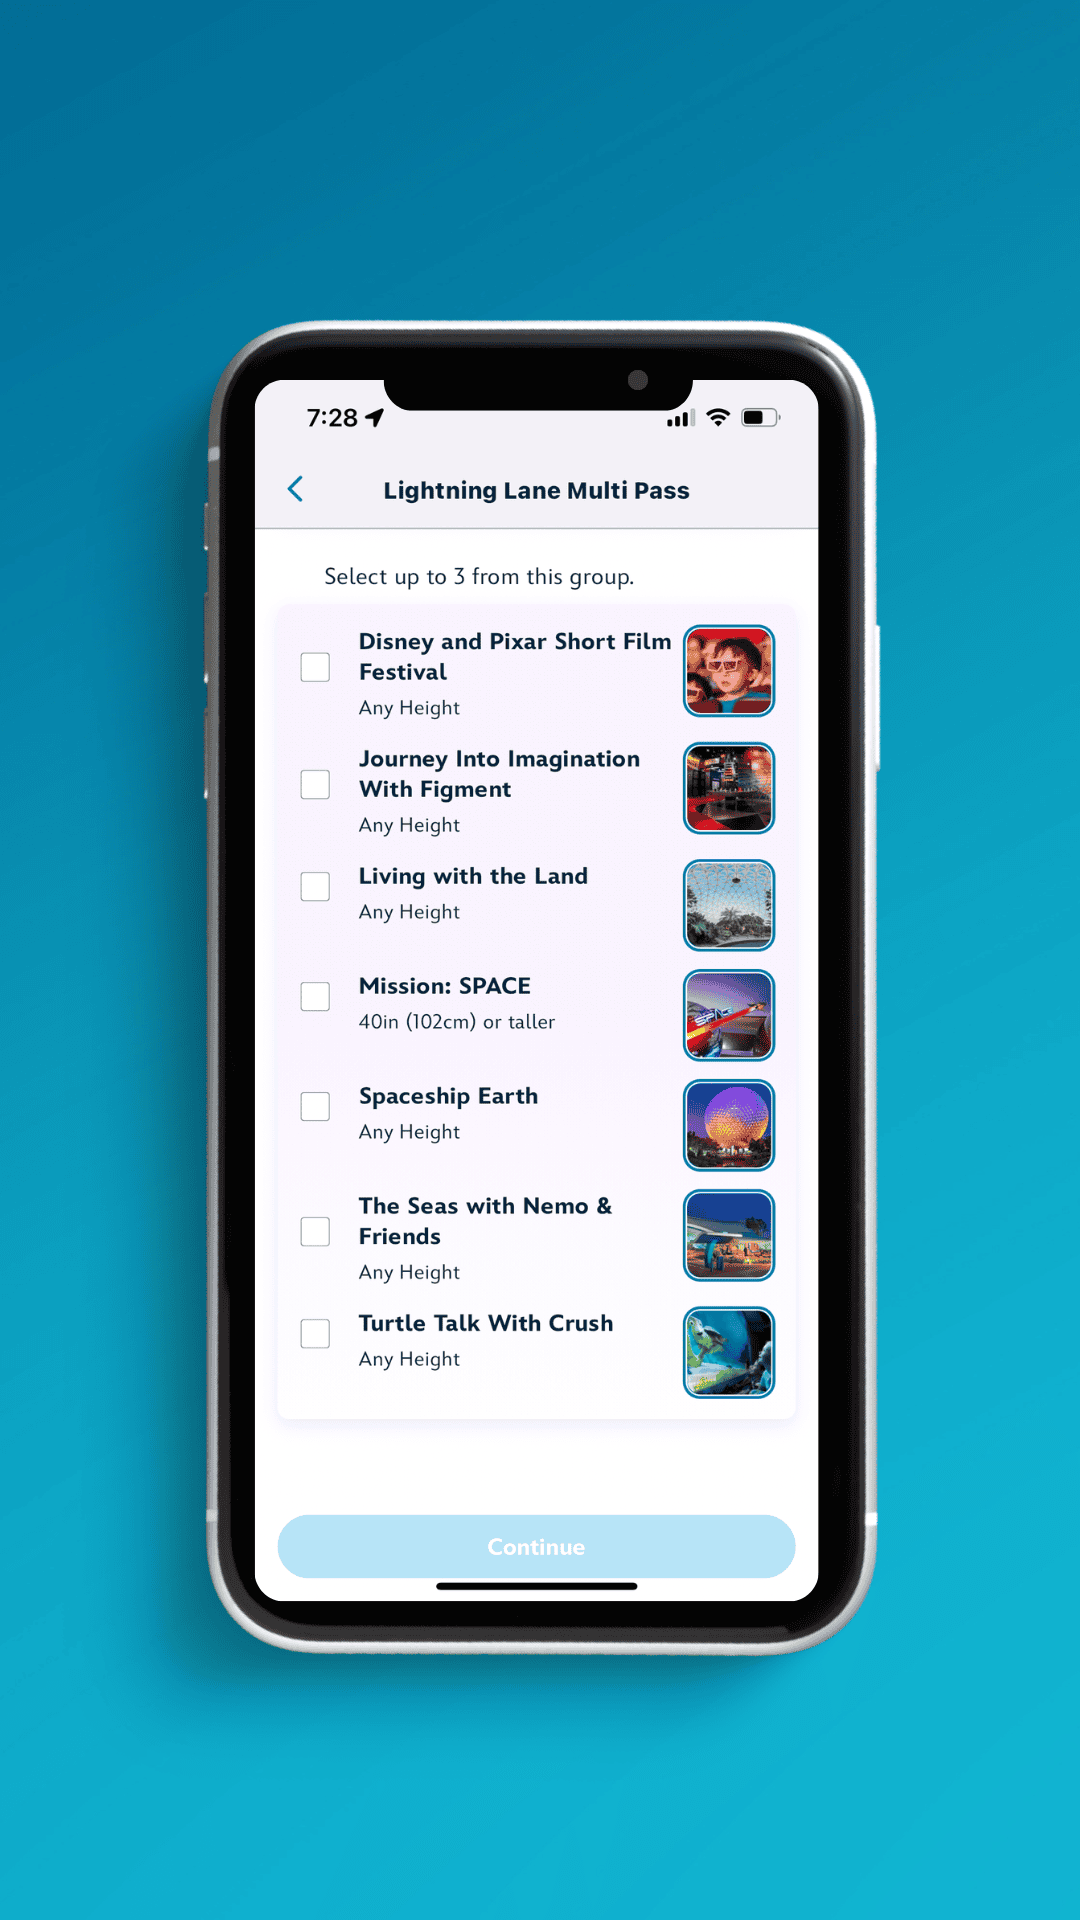
Now, it’s time to begin selecting attractions. If you use our ride selector, you’ll already have a list of the attractions you want to select. For Magic Kingdom, Epcot, and Hollywood Studios, you can select one Lightning Lane from the first group. Then, you can select two Lightning Lanes from the third group. Animal Kingdom does not have tiers, so you’ll select all three attractions from the same group for that park.
*You can only select three (3) Lightning Lane Multi Pass rides per day before your vacation. Once you enter a park and use your first Lightning Lane, you can replace it with another ride. You can continue to do this every time you redeem a Lightning Lane as long as new options are available. Remember that you can only use one Lightning Lane per attraction each day.
Step Eight: Select Desired Times
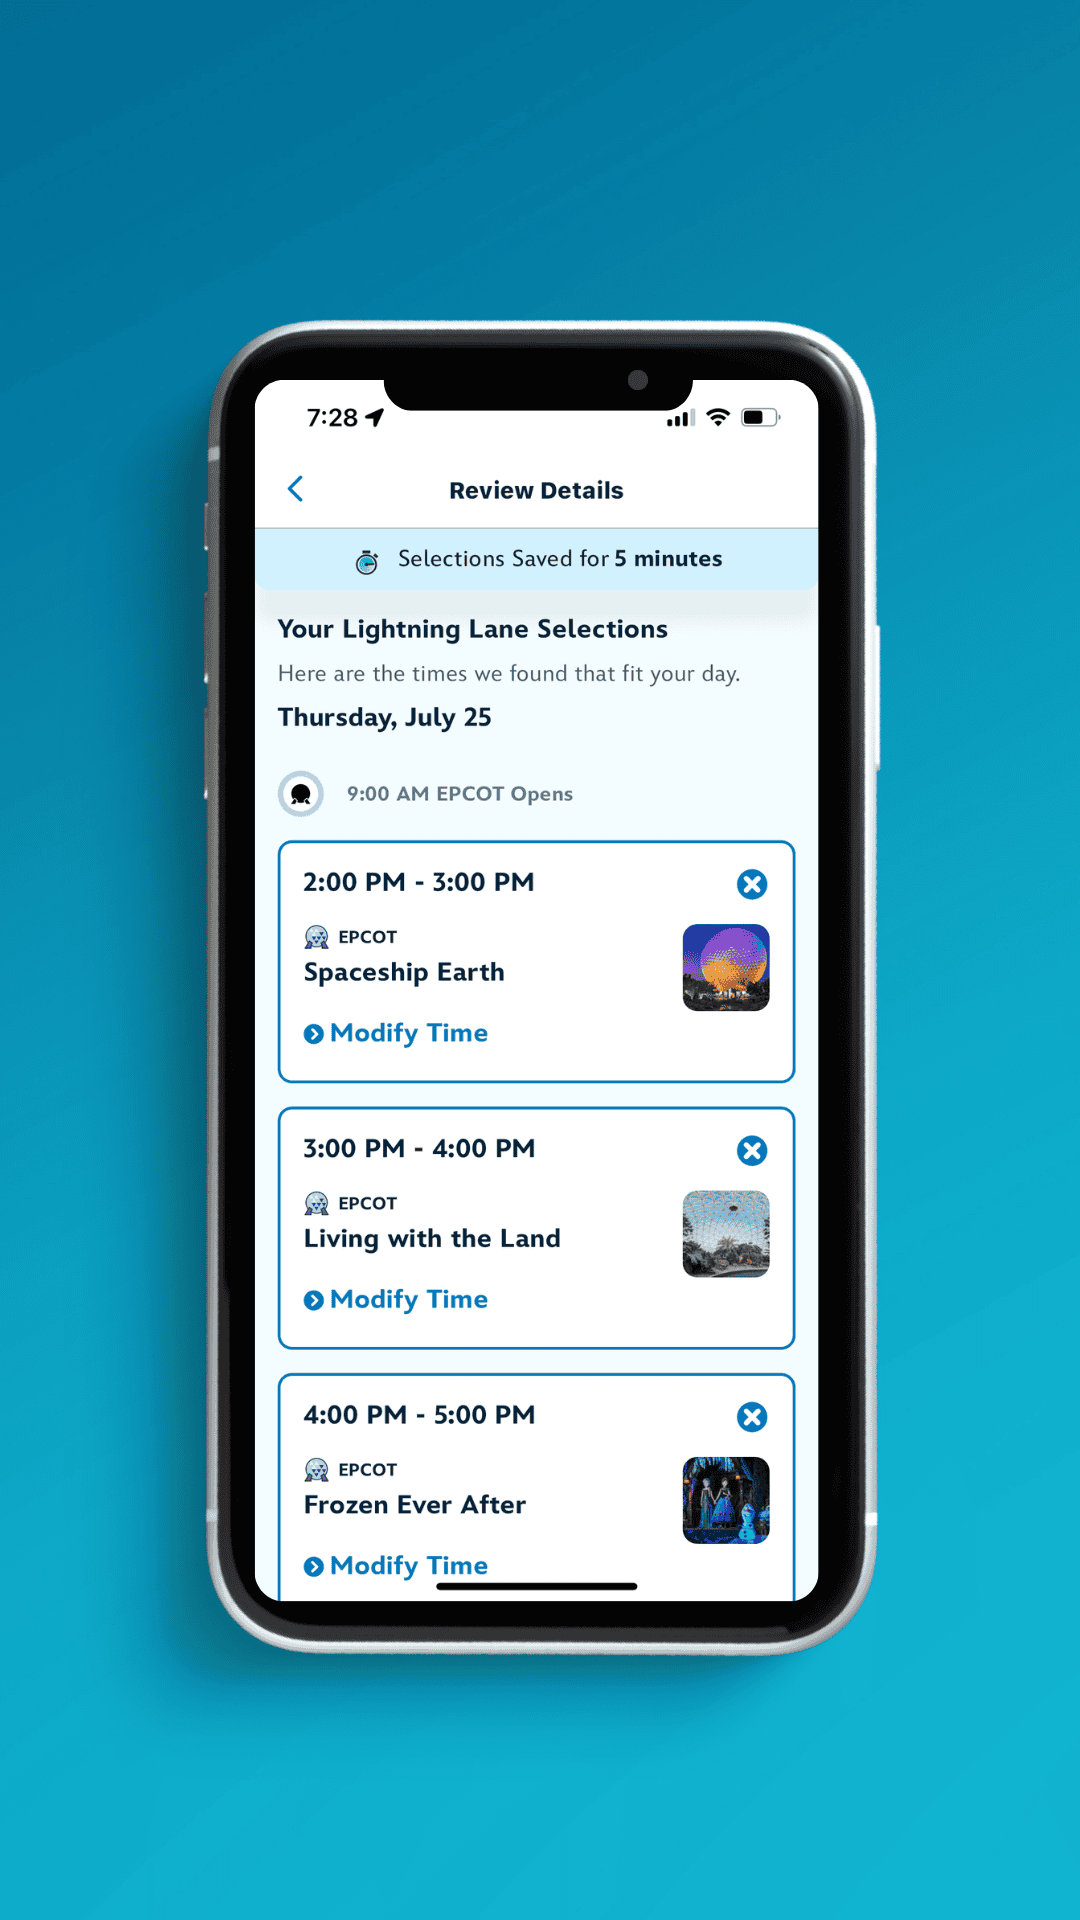
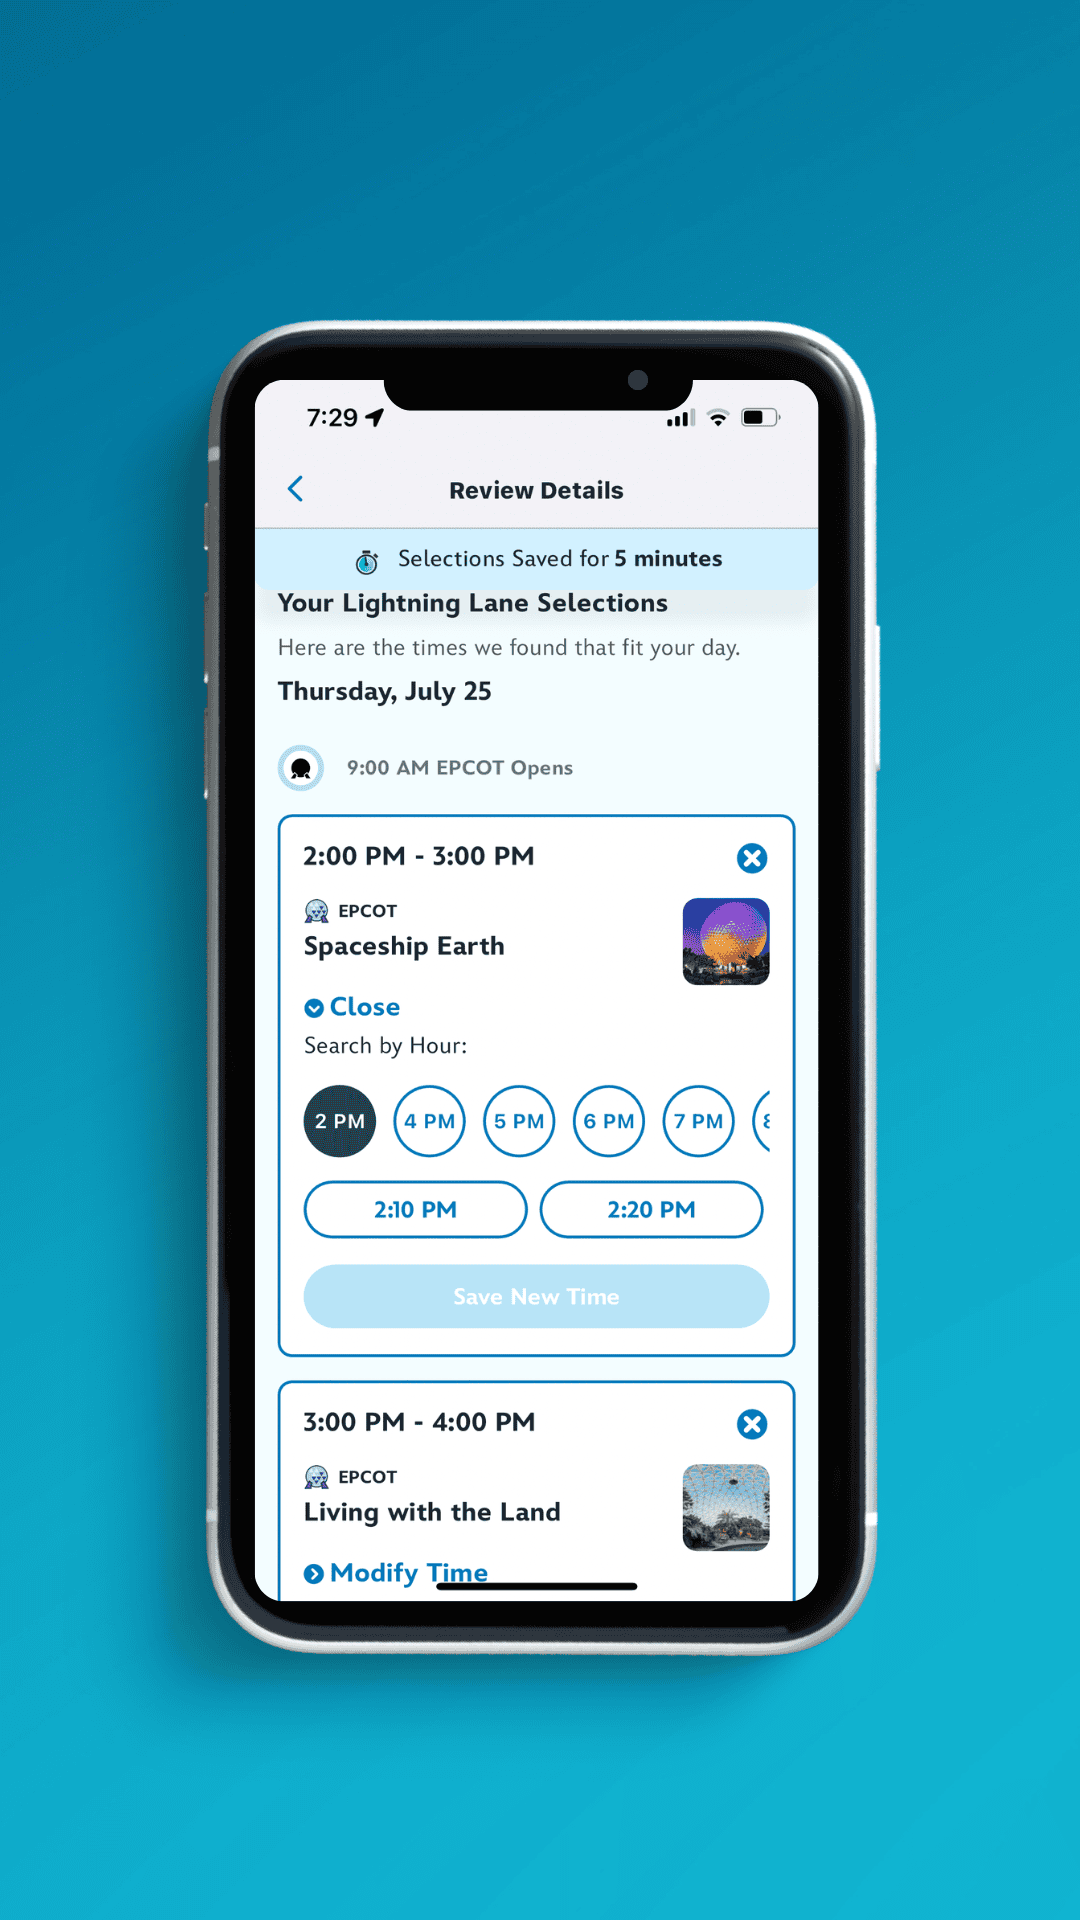
After confirming the three initial attractions, they will appear on a new screen with time ranges. You can then select modify to adjust the times based on availability. While this is only an example below, it’s important to note that I selected these times at 7:30 a.m. on the day of my visit. Even though it was early morning, the first time for available attractions was 2:00 p.m.!
These screenshots were taken the day the system debuted, so I didn’t have the opportunity to purchase Lightning Lanes in advance. But it’s a clear indicator that you need to be up at 7:00 a.m. EASTERN time when your window opens with a clear plan of what to book and desired time ranges.
Step 9: Finalize your Purchase
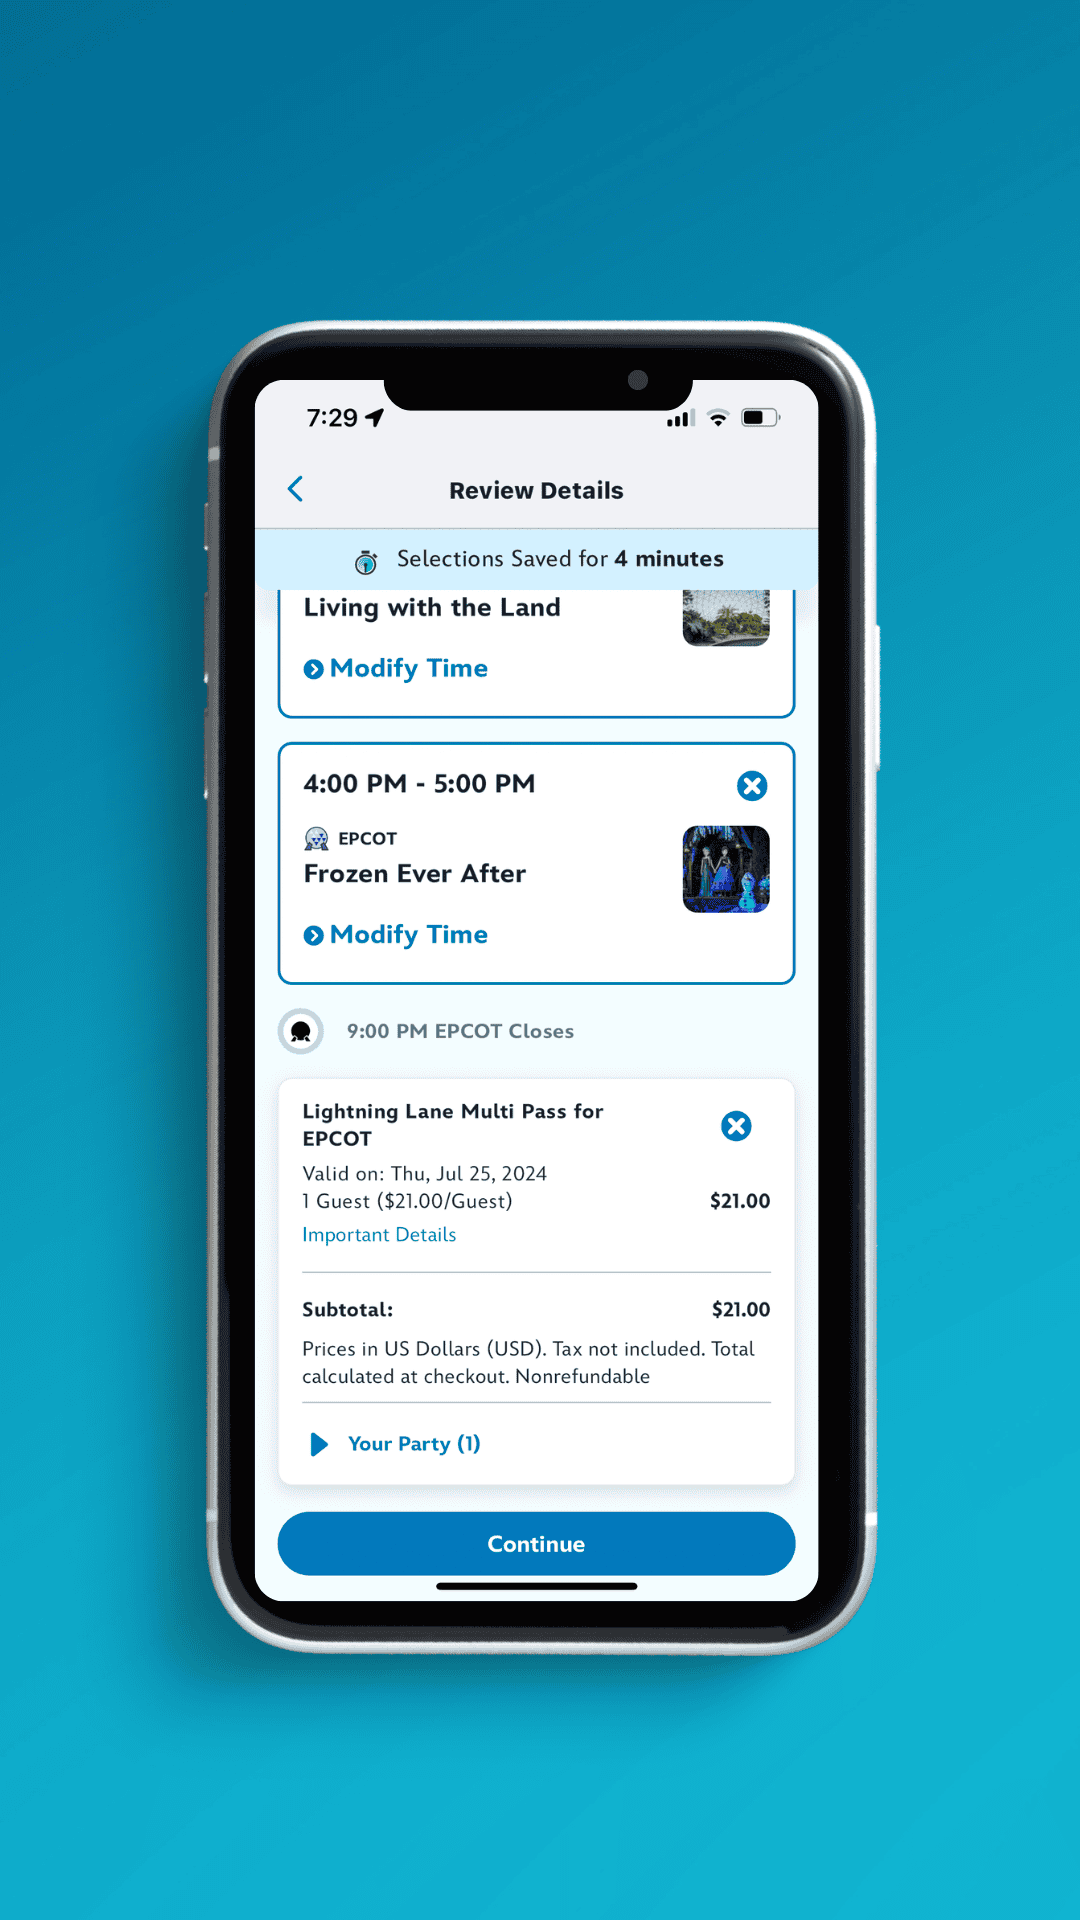
After making your final selections, the total pricing is displayed at the bottom of the screen. You can press continue, and the payment screen will appear. From there, you can enter your payment details and proceed.
Disney states on their website that Lightning Lanes are non-transferable and non-refundable.
That’s it! You’ve selected and purchased your Lightning Lanes and can continue to plan another day the same way! We hope you found this information helpful. If you haven’t yet, make sure to get a copy of the Resorts Gal Ride Selector.

Our ride selector tool simplifies the process of choosing Lightning Lanes and desired time ranges. You’ll have a plan formed for each park day in minutes!
Final Thoughts
For more on Lightning Lane passes at Walt Disney World, you might like the following:
- Lightning Lane Attractions for Every Park at Disney World
- Magic Kingdom Lightning Lane Multi Pass Strategies
- Free Ride Spreadsheet for Disney’s Hollywood Studios
- Free Ride Spreadsheet for Epcot
In the Comments
Did you find this walk-through helpful? Let us know in the comments section below.

